If you are just starting to play with digital elements, the easiest thing to learn is how to add words to your photos. It will teach you "layering" which will be your first "techy" word to add to your new digital vocabulary. ;)
The supplies you will need are:
1. Adobe Photoshop
I use Adobe Photoshop CS5, but you can use a later version or Photoshop Elements too.
2. A digital photo.
I am using this one of me in a patch of weeds. (Hey, anything looks good when you make it black and white.)
3. Digital Word Kit
I am using Heidi Swapp's Gratitude Word & Quote Kit. You can purchase and download it on her website here.
Simple instructions:
1. Open your photo in Photoshop, by right clicking your photo, hoovering your mouse over "Open With" and clicking on "Photoshop."
You will see something similar to the following:
Now, don't worry if your screen looks a little different. Depending on what Photoshop you may have it will look slightly different. For what we are doing today, the idea is the same across all programs.
2. Now, go to your folder where you downloaded your Heidi Swapp words.
I will take this time to tell you to put all your digital items in one folder on your computer. Store them inside this folder in simple categories to help you stay organized. You can see how I have organized my categories below. I wish someone told me this when I first started downloading items. ;)
I have folders like: PS Actions, Ali [Edwards] Brushes, Blog Bling, Calendars, Christmas, Frames, and Kits. "Kits" is where I store digital scrapbooking collections by artist.
Inside my "Kits" folder, I have a sub-folder of each artist and then inside that folder are the items I downloaded.
Now, "Why stay so organized," you ask? Well, as you start collecting product, you will need a way to find it easily. Also, this one folder of digital items can now be dragged to an external hard drive.
Believe me when I say you WILL want to back these files up. Just take my word for it. When my laptop fried and all my digital files were on that baby, I was extremely happy I backed everything up on discs and even made sure to get an external hard drive after that episode. ;)
Open the file you have stored your Gratitude Quotes and drag it to Photoshop.
Dragging it instead of right clicking on it will put it on the project you are working on (in this case the photo).
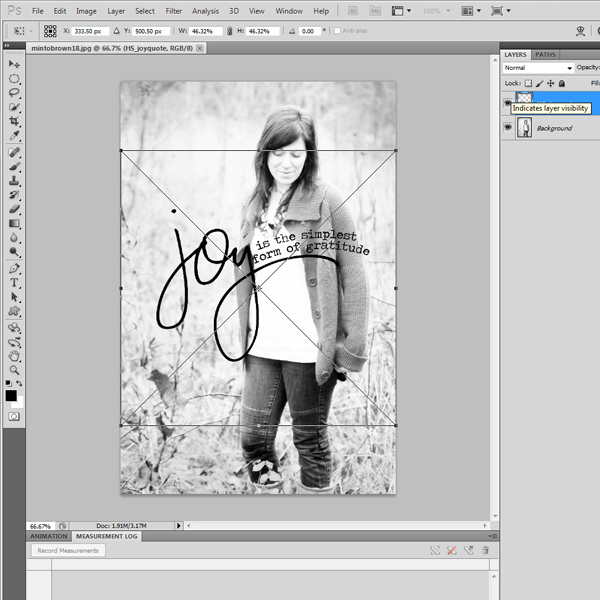
3. If you have a box around your quote, like I do above, you will want to adjust the size of the quote so it isn't so large.
(If you don't have a box yet, at the top of your screen click on Edit_Free Transform. Or, the short cut is Ctrl+T. I use shortcuts when possible. Note: Some Elements short cuts are different than CS short cuts)
Holding the SHIFT key use your mouse to click the edge of the square around your quote and you can adjust the size of the quote to fit on your photo. Holding the shift key will keep your image from getting distorted as you resize it. When it is the size you like, let go of the SHIFT key.
Click on the quote and move it to the spot you would like it on your photo.
I am not going to get into changing the color of the word today. If you want to do that, you can find some helpful tips at Designer Digitals.
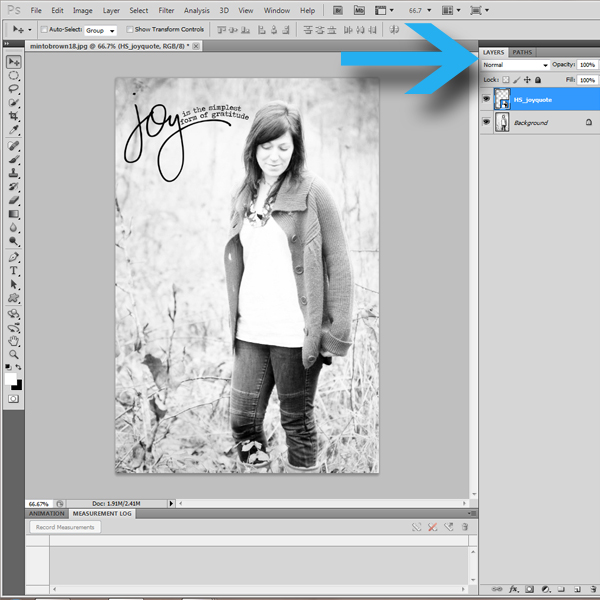
4. Before saving your image, you need to "flatten" your layers. (Hey, there is your first digi "techy" word!) If you don't your image will not be crisp and clear but blurry.
Here is where you can see all the layers you have created so far. If your "Layers" tab is not open click on it.
All those "layers" need to be flattened. To do that, click on Layer_Flatten Image, as seen below.
When you do so, you can now see that the "layers" on the right of your screen are now one.
5. Now, it is time to save your image!
Click File_Save As. Always click Save As. You never want to accidentally override an original digital image. (When closing Photoshop if windows pop up that ask if you want to save your image. You already did, so do not save them again since it will be asking to save over the original image.)
Now you are finished! Can you believe it?! You just created your first "digital scrapbook page!" What?! Did you know that is really what you did? Just imagine doing the same thing with digital paper instead of a photo and digital embellishments instead of the quote? Then add your photo too and you have a digital scrapbook page!
Ok, maybe I am getting ahead of myself, but stay tuned in and I will help you get there!
Create Well: You can do digital. Try it.


