The hardest part about being a creative working with a craft store is wanting to learn every craft. In fact, at my local craft store they know me by name. I have no fear in asking as many questions about how to make something that is in my mind with the supplies in their store. So when I saw the leather strips in the jewelry department, I knew I had to try out Heidi Swapp's new Art Screens on them and make my own cuff.
Showing posts with label jewelry. Show all posts
Heidi Swapp - Art Screen Leather Cuff
Wednesday, May 20, 2015The hardest part about being a creative working with a craft store is wanting to learn every craft. In fact, at my local craft store they know me by name. I have no fear in asking as many questions about how to make something that is in my mind with the supplies in their store. So when I saw the leather strips in the jewelry department, I knew I had to try out Heidi Swapp's new Art Screens on them and make my own cuff.
Craft Warehouse - Vintage Hollywood Inspired Feather Headband
Thursday, July 10, 2014I can't stand the cuteness and neither could my family. When I got this little one dressed for her big day Sunday, her outfit wasn't complete without this darling headband. It completed the outfit.
It was just beautiful. She sat for her photos perfectly while we all clapped and laughed at how perfectly darling she was. We couldn't help it. She is our little princess!
You can get the directions to this headband at the Craft Warehouse blog today!
Create Well: A 15 minute DIY gave me priceless photos and memories.
Heidi Swapp - Trendy Leather Cord Bracelets
Friday, November 15, 2013I have been waiting to share this project for almost a month now! I wanted to create a piece of jewelry that anyone could do - no skills or tools required! I sketched my design, went into my local Craft Warehouse and talked to the awesome girls in the bead department (who knew what they were talking about). They helped me gather the supplies I needed to make my design complete and I went home to make my bracelets.
After the first one I was hooked! The only advice I would give you would be to use strong jump rings! The charms are heavy and the cord is stiff. So, you want to make sure it doesn't fall apart. I wore mine for several weeks to make sure that it would hold up!
Go ahead and go to Heidi's blog today to get the full tutorial!
Create Well: Have an idea? Don't be afraid to talk to those that might help you get that idea from your sketch book on to your craft table!
DIY Cuff and Layered Bracelets
Thursday, August 16, 2012I have been waiting to share this handmade cuff for sometime now! I was inspired when I was creating these Smash Book pages for Craft Warehouse.
I am not a jewelry maker. But I do like jewelry. If I can figure out how to create handmade jewelry without tools, I will.
I was at Walmart and found this leather cuff on the clearance rack for only $5 and picked it up! I usually decide whether it is a good clearance deal when I try and figure out how much it would cost me if I had to make it myself. ;) This was a deal since it had three snaps for the closer. I knew I was going to like the weave of the leather for hanging chains.
I found Ruby Violet items by Lilla Rogers on sale and got a few to create the top of the cuff and used Helmar's 450 Quick Dry to glue the pieces right on to the leather. Hanging from the chain (not shown) are three bird charms, one for each of our family.
Now, I am always on the lookout for bracelets to layer with my new handmade cuff!
Create Well: Jewelry making doesn't have to be hard. Find pre-made items that you like and layer them together to get a style all your own!
Evans Photography - Craft Warehouse
Thursday, August 9, 2012
The Samantha Walker Blog Hop is still under way so scroll down for an awesome giveaway!
I am so excited that today on the Craft Warehouse Blog, a little project I created for Craft Warehouse is live! Craft Warehouse started carrying {Styled} by Tori Spelling, a DIY jewelry line where no tools are needed to create stunning pieces! I fell in love with it all when it was released at Winter CHA and am ecstatic that it is in Craft Warehouse stores!
I had the honor of doing a photo shoot to showcase some of the pieces on the blog and having my friend, Jessica, modeling for me. She's super cute. ;)
All the pieces are so much fun! You can mix and match to fit that outfit for the day. I love it!
I have already bought several of the different bracelets to layer with my bangles. You can see them here. I am totally in love with these! They just clip on to a toggle! It is that easy!
Jessica was so "hot" in this dress that she had cars honking by us during this dress change. ;) We were downtown on a Sunday evening, needless to say, she was the nicest dressed on the street. ;)
You can see my new video that will be played in Craft Warehouse stores promoting the new collection!
I am so excited that today on the Craft Warehouse Blog, a little project I created for Craft Warehouse is live! Craft Warehouse started carrying {Styled} by Tori Spelling, a DIY jewelry line where no tools are needed to create stunning pieces! I fell in love with it all when it was released at Winter CHA and am ecstatic that it is in Craft Warehouse stores!
I had the honor of doing a photo shoot to showcase some of the pieces on the blog and having my friend, Jessica, modeling for me. She's super cute. ;)
All the pieces are so much fun! You can mix and match to fit that outfit for the day. I love it!
I have already bought several of the different bracelets to layer with my bangles. You can see them here. I am totally in love with these! They just clip on to a toggle! It is that easy!
Jessica was so "hot" in this dress that she had cars honking by us during this dress change. ;) We were downtown on a Sunday evening, needless to say, she was the nicest dressed on the street. ;)
You can see my new video that will be played in Craft Warehouse stores promoting the new collection!
Create Well: Create stunning pieces to go with your stunning personality.
Pink Paislee - Spring Jubliee Fabric Cuff
Wednesday, January 25, 2012
Have you ever been in the middle of a project and all of a sudden it hits you - HARD... You freak out inside (or sometimes on the outside, which I have been known to do in the middle of a scrap retreat). You realize that you love creating. You love art. You are having that "Ahh-ha" moment. That you were created to be creative.
Yeah, that was me [again] last week when I created this cuff for the Pink Paislee CHA booth.
I created the cuff with a muslin base. It was created similar to the cuff shared here. But, I actually sewed the sections together on the front instead of just gluing them. I did use Helmar's 450 Quick Dry for keeping pieces down flat.
I tested a Faber Castell Indian Ink Brush Pen on the muslin and it worked so well! I even splashed water on my test material and not one smudge. It was totally amazing. I placed all the stamps of the Pink Paislee Spring Jubilee on my acrylic block, colored it in with the brush pen, and stamped away!
I also colored the Mistables Ribbon by Pink Paislee. So amazing how easy this was!
Create Well: "For we are God's workmanship, created in Christ Jesus to do good works, which God prepared in advance for us to do." - Ephesians 2:10
Yeah, that was me [again] last week when I created this cuff for the Pink Paislee CHA booth.
I created the cuff with a muslin base. It was created similar to the cuff shared here. But, I actually sewed the sections together on the front instead of just gluing them. I did use Helmar's 450 Quick Dry for keeping pieces down flat.
I tested a Faber Castell Indian Ink Brush Pen on the muslin and it worked so well! I even splashed water on my test material and not one smudge. It was totally amazing. I placed all the stamps of the Pink Paislee Spring Jubilee on my acrylic block, colored it in with the brush pen, and stamped away!
I also colored the Mistables Ribbon by Pink Paislee. So amazing how easy this was!
Create Well: "For we are God's workmanship, created in Christ Jesus to do good works, which God prepared in advance for us to do." - Ephesians 2:10
Helmar & May Arts - Romantic Ribbon Cuff
Friday, January 13, 2012
I am so excited to share with you the second part of my project for Helmar & May Arts Week! I created Romantic Ribbon Trim earlier in the week and now I am sharing my Romantic Ribbon Cuff.
To create this lovely bangle, follow the directions of creating my ribbon trim as shown in the three minute video below. Cut your fabric to about 8"x3".
Instead of cutting your fabric into strips, cut another piece of fabric with iron-on interfacing to the same size and put right sides together. Sew the two pieces of fabric together and leave an opening on one side. Flip inside out. Top stitch the opening closed adding a little ribbon to loop onto a button to close the bracelet. I used my heavy duty needle and a 4-5 stitch to top stitch the whole thing so it would look quilted.
I used a little crocheted doily in the middle and added an 18 gauge wire to the little porcelain doll. I glued these down with Helmar's 450 Quick Dry. Did you know this glue is machine washable? Perfect for your fabric projects.
I then added the bling! To create these faux pearls with a pearl paint pen and clear string, watch the one and a half minute video below.
I took the string of pearls and again, used Helmar's 450 Quick Dry to glue them down. The easiest way I found to glue them was to rub the pearl along the tip of the bottle. Then put the pearl on the fabric. Do this one pearl at a time. They adhered perfectly and beautifully!
Create Well: Use your scraps of ribbon to create a one-of-a-kind piece of wearable art.
To create this lovely bangle, follow the directions of creating my ribbon trim as shown in the three minute video below. Cut your fabric to about 8"x3".
Instead of cutting your fabric into strips, cut another piece of fabric with iron-on interfacing to the same size and put right sides together. Sew the two pieces of fabric together and leave an opening on one side. Flip inside out. Top stitch the opening closed adding a little ribbon to loop onto a button to close the bracelet. I used my heavy duty needle and a 4-5 stitch to top stitch the whole thing so it would look quilted.
I used a little crocheted doily in the middle and added an 18 gauge wire to the little porcelain doll. I glued these down with Helmar's 450 Quick Dry. Did you know this glue is machine washable? Perfect for your fabric projects.
I then added the bling! To create these faux pearls with a pearl paint pen and clear string, watch the one and a half minute video below.
I took the string of pearls and again, used Helmar's 450 Quick Dry to glue them down. The easiest way I found to glue them was to rub the pearl along the tip of the bottle. Then put the pearl on the fabric. Do this one pearl at a time. They adhered perfectly and beautifully!
Create Well: Use your scraps of ribbon to create a one-of-a-kind piece of wearable art.
blog hop,
digital art,
fabric,
giveaways,
home decor,
hybrid,
jewelry,
mixed media,
recycle,
Samantha Walker,
scrapbooking
Samantha Walker - New Beginnings Blog Hop
Tuesday, January 10, 2012
Welcome to the first Samantha Walker Blog Hop of 2012! If you found me from Angi Barrs' blog I am so happy to have you here! Samantha Walker will be having a blog hop once a month where her Design Team will be sharing their creations with her brilliant products! You can start the hop here.
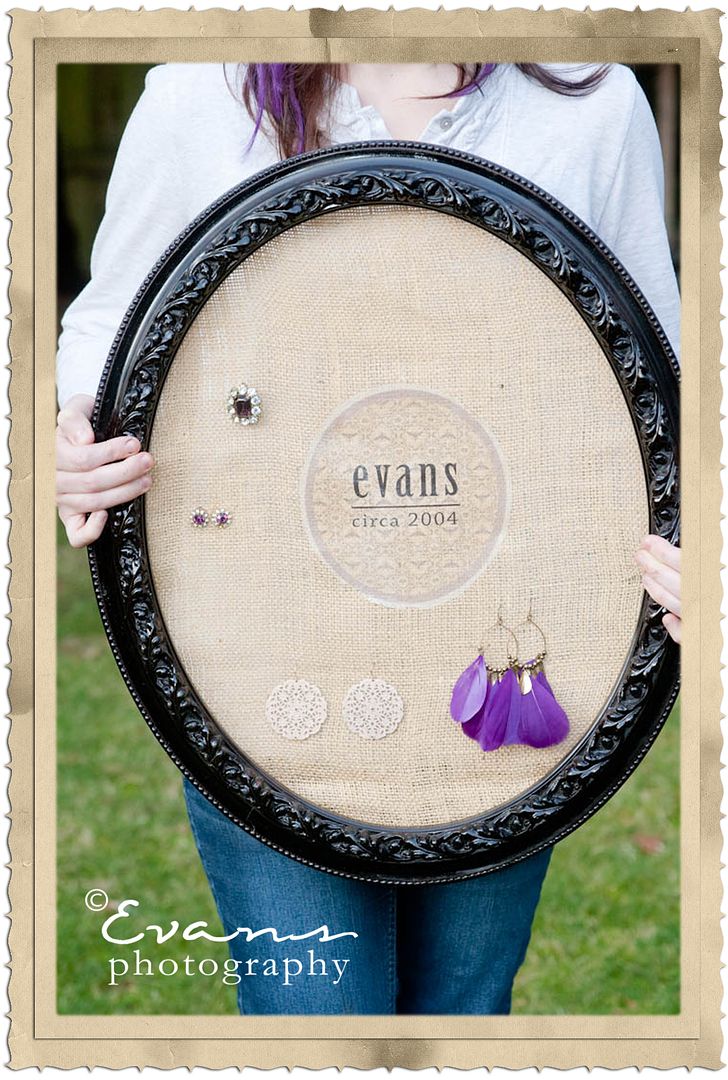
This month, I have two burlap hybrid projects to show! The first one is this re-purposed frame into an earring holder. For Christmas, I got these great feather earrings from Forever 21 (thanks Mum!). They go great with my purple hair extensions. ;) I think it is so funny that I spent an afternoon making this for my $4 earrings. Ha!
To create the frame follow these instructions:
1. Find a frame at a thrift store or re-purpose one like I have done. Remove the glass and back. Spray paint it the color of your choice. I used black for a classic look.
2. Next open Photoshop and create a new project by clicking on File, then New. Make your project 8.5 x 11 inches. Use 300 resolution on a white background and click on OK.
3. If you are new to Photoshop, find the tool bar and put your cursor over the tools. Find the Ellipse tool. Click on it. Then find the circle (or oval shape) and click on it. Then, on your document click and drag your mouse to create a circle. I made mine large enough to fit in the file leaving the edges clear. Make enough room for step 4.
4. Do this again to make a "mat" around your first circle.
5. Open your file of digital pattern paper. Drag the paper you wish to use for the mat into Photoshop. I used the Circle Grey paper from Samantha Walker's Honey Golden Sunlight Paper Pack. Then you want to make sure this layer is large enough to fit in the circle. On the right, you will see a list of your layers. Click on the paper layer you just added. Drag it to go above your mat layer. Then, on the top of your screen you will see "Layer" click the drop down menu and click on "Release Clipping Mask" (or short key for Photoshop CS2 Ctrl+Alt+G). This will make your gray paper into the mat.
6. Do step five again with the center circle this time. I used the Honey Comb from the same pack. It is vintage-chic with the bees on it!
7. On your tool bar you have a text tool. Click on it and then click again on your project. Find a font you like and begin typing. I used the year my husband and I were married. I wanted it to be something my husband could stand to look at. ;) A quote would work well too.
8. Save the project as a Photoshop document (Click Save As and then to your computer). I also saved it at as a JPEG by clicking Save As, JPEG, and then to my computer at 12, the highest quality image.
9. Next use a t-shirt printer transfer. I got mine at my local craft store. I followed the instructions on the package. It has an online program to reverse the image which I did. I then printed the image on the transfer paper.
10. According to the transfer's instructions, iron it to the burlap. Make sure the edges are all done. Burlap is a hard surface to iron to, so go slow in removing the backing.
11. Using a staple gun, staple the back of the burlap to the frame starting with the top then going to the bottom, side, to side, and then filling in the gaps.
12. Cut the excess burlap off and hang!
Here is another burlap project using the Harvest Moon Mega Pack. I love how many elements are in this kit. There are many you can use anytime of year! This digital frame was used with a quote this time (inspired from Pinterest). It is easier to make since you don't need to create any shapes using a digital frame.
Create Well: Use burlap and iron-on transfers to create a home decor piece you would be proud of!
This month, I have two burlap hybrid projects to show! The first one is this re-purposed frame into an earring holder. For Christmas, I got these great feather earrings from Forever 21 (thanks Mum!). They go great with my purple hair extensions. ;) I think it is so funny that I spent an afternoon making this for my $4 earrings. Ha!
To create the frame follow these instructions:
1. Find a frame at a thrift store or re-purpose one like I have done. Remove the glass and back. Spray paint it the color of your choice. I used black for a classic look.
2. Next open Photoshop and create a new project by clicking on File, then New. Make your project 8.5 x 11 inches. Use 300 resolution on a white background and click on OK.
3. If you are new to Photoshop, find the tool bar and put your cursor over the tools. Find the Ellipse tool. Click on it. Then find the circle (or oval shape) and click on it. Then, on your document click and drag your mouse to create a circle. I made mine large enough to fit in the file leaving the edges clear. Make enough room for step 4.
4. Do this again to make a "mat" around your first circle.
5. Open your file of digital pattern paper. Drag the paper you wish to use for the mat into Photoshop. I used the Circle Grey paper from Samantha Walker's Honey Golden Sunlight Paper Pack. Then you want to make sure this layer is large enough to fit in the circle. On the right, you will see a list of your layers. Click on the paper layer you just added. Drag it to go above your mat layer. Then, on the top of your screen you will see "Layer" click the drop down menu and click on "Release Clipping Mask" (or short key for Photoshop CS2 Ctrl+Alt+G). This will make your gray paper into the mat.
6. Do step five again with the center circle this time. I used the Honey Comb from the same pack. It is vintage-chic with the bees on it!
7. On your tool bar you have a text tool. Click on it and then click again on your project. Find a font you like and begin typing. I used the year my husband and I were married. I wanted it to be something my husband could stand to look at. ;) A quote would work well too.
8. Save the project as a Photoshop document (Click Save As and then to your computer). I also saved it at as a JPEG by clicking Save As, JPEG, and then to my computer at 12, the highest quality image.
9. Next use a t-shirt printer transfer. I got mine at my local craft store. I followed the instructions on the package. It has an online program to reverse the image which I did. I then printed the image on the transfer paper.
10. According to the transfer's instructions, iron it to the burlap. Make sure the edges are all done. Burlap is a hard surface to iron to, so go slow in removing the backing.
11. Using a staple gun, staple the back of the burlap to the frame starting with the top then going to the bottom, side, to side, and then filling in the gaps.
12. Cut the excess burlap off and hang!
Here is another burlap project using the Harvest Moon Mega Pack. I love how many elements are in this kit. There are many you can use anytime of year! This digital frame was used with a quote this time (inspired from Pinterest). It is easier to make since you don't need to create any shapes using a digital frame.
"We are constantly invited to be what we are." - Henry David Thoreau
To be entered to win a $10 gift certificate to use in Samantha Walker's digital store and a can of Preserve Your Memories II Acrylic Spray care of Preserve Your Memories, make sure to leave a comment on my blog. One random winner will be picked from all the comments left on the design team members' blogs. To help increase your chance of winning, make sure to follow Samantha's blog or facebook page. Then, comment again letting us know you have! (Note: Shipping for the Acrylic Spray is only available in the US due to mailing aerosol restrictions.)
Click on the link below to go on to the next team member's blog to see what they've created!
Create Well: Use burlap and iron-on transfers to create a home decor piece you would be proud of!
Helmar - FabScraps Dangle
Monday, December 5, 2011
Today, I wanted to show you another wonderful gift idea. This dangle can be attached to any necklace you already own. This way you can wear it high or low with any outfit. This dangle looks even more "vintage" with a few pearls hanging from FabScrap charms.

It was made the same way the necklaces were that I shared with you on Saturday. I just cut chain to the size I wanted and added the embellishments with jump rings. I loved the vintage style charms from FabScraps.
How easy is that? Just attach a clasp at the end of the chain to hang it on anything. (You could also create a simple keyring this way too!) I also used the filigree in this kit to make it hang on the necklace.
Now, I wanted to show you how I created the string of pearls... (This is the fun part!)
Remember, I am not a bead-er and if you are, you have serious patience. ;) Plus, beads can get pricey if you are creating several gift items.
The supplies you need to create the string of pearls are as follows:
a non-stick craft sheet
Pearl Paint Pen in white
invisible thread (you can use clear beading string, but it will be stiffer and not dangle along with the charms)
Helmar's 450 Quick Dry
On you craft sheet, tape your invisible thread all the way across it. Do it multiple times. It takes a long time for this paint to dry so doing several strands would be wise. Use the paint pen to make your pearls along the thread. Let it dry at least six to eight hours.
Watch the video to see how I do it...
It was made the same way the necklaces were that I shared with you on Saturday. I just cut chain to the size I wanted and added the embellishments with jump rings. I loved the vintage style charms from FabScraps.
How easy is that? Just attach a clasp at the end of the chain to hang it on anything. (You could also create a simple keyring this way too!) I also used the filigree in this kit to make it hang on the necklace.
Now, I wanted to show you how I created the string of pearls... (This is the fun part!)
Remember, I am not a bead-er and if you are, you have serious patience. ;) Plus, beads can get pricey if you are creating several gift items.
The supplies you need to create the string of pearls are as follows:
a non-stick craft sheet
Pearl Paint Pen in white
invisible thread (you can use clear beading string, but it will be stiffer and not dangle along with the charms)
Helmar's 450 Quick Dry
On you craft sheet, tape your invisible thread all the way across it. Do it multiple times. It takes a long time for this paint to dry so doing several strands would be wise. Use the paint pen to make your pearls along the thread. Let it dry at least six to eight hours.
Watch the video to see how I do it...
After they are dry, flip them over and apply the paint again over top the flat area. Have fun creating large or small beads right next to each other.Let them dry another 4-6 hours. You can tell they are done by touching them slightly.
Take the string of pearls and tie them to the chain at different lengths. I used two strands, but three is fun too! Cut the strand to the length you like leaving a little thread at the end of the strand.
Then, to make sure each bead stays put, add a little dab of Helmar's Quick Dry glue to the end of the strand with a tooth pick.
Can you imagine FabScraps silver charms with red or green for a holiday look?
To create regular pearls, like in the necklaces posted earlier, you can just put the pearl paint on the non-stick craft sheet without any thread. When it dries, add Helmar's 450 Quick Dry to the back and place the pearls on paper, fabric, or even FabScrap's filigrees.
When I wear my dangle, my family and friends are shocked that it was handmade. In fact, when they find out it is they have to take another look. ;)
Take the string of pearls and tie them to the chain at different lengths. I used two strands, but three is fun too! Cut the strand to the length you like leaving a little thread at the end of the strand.
Then, to make sure each bead stays put, add a little dab of Helmar's Quick Dry glue to the end of the strand with a tooth pick.
Can you imagine FabScraps silver charms with red or green for a holiday look?
To create regular pearls, like in the necklaces posted earlier, you can just put the pearl paint on the non-stick craft sheet without any thread. When it dries, add Helmar's 450 Quick Dry to the back and place the pearls on paper, fabric, or even FabScrap's filigrees.
When I wear my dangle, my family and friends are shocked that it was handmade. In fact, when they find out it is they have to take another look. ;)
Helmar - Charmed Necklaces
Sunday, November 27, 2011I am by no means a jewelry maker, but I love all forms of art. Being a mixed media artist, I can't help but have my hands into all forms of creating. FabScraps is not only a great company for scrapbooking, but I fell head-over-heals for their charms and filigrees. They are perfect for making those one of a kind necklaces for yourself or a loved one this holiday season!
Here is a video of the necklaces and how I created them.
I used Helmar's 450 Quick Dry for both necklaces.
Note: In the video you can see a white glue on the flower. I tried using Helmar's Gemstone Glue but I ended up using 450 Quick Dry instead after removing it with Helmar's Remove, their awesome adhesive removal. (Gotta love the creative process!) I would recommend 450 Quick Dry on any crafting metal surface.
Stay tuned in for next week's FabScrap Week with more of their products to share created by the Design Team! Monday at Helmar, I will share another great gift idea with a video to show you how I created the "faux" pearls for these necklaces.
Create Well: Wanna make it? Just try...
DIY Feather Hair Extension and Clip
Friday, November 25, 2011Feathers are all the rage right now. What better way to give in and make your teenager happy this season by giving her a collection of homemade feather clips? These are so easy that you might make a collection of them to give away!
Supplies:
A Variety of Craft Feathers (This one was made with a package of colored ones you can find in the craft department. But, if you want even nicer ones you can buy them separately with the hair extensions. There are so many to choose from at your local Craft Warehouse!)
Chain (You can find a selection of chain in the beading department. I chose silver, but there are several kinds to choose from.)
Charms (You can also find these in the beading department.)
Wire and Wire Cutters
Twine (Pick a thin twine to use for this project. I used a fine black floss. Look around for one you like in the scrapbooking, fabric, craft, or beading departments.)
Jump Rings (regular jump rings can be found in the beading department)
Snap Hair Clips
Lay your supplies on a non stick craft sheet or wax paper. Find the feathers you would like to use and arrange them. I found that three thin ones and two larger ones worked well.
I actually used picture hanger wire but any thin or fine wire would work fine. Wrap the feathers together with about four inches of wire starting from the bottom working to the top. Use the end of the wire to wrap into a little loop at the top. Clip off any extra wire and wrap the last part of the wire around the feathers.
Use liquid glue to coat the wire. Use your twine to wrap around the wire so you hide the wire. Make sure to get the ends into the glue. Let it dry.
Decide how much chain you would like. If you are making it for someone with long hair you will want it long to hang down low. If the person has short hair, they will most likely wear it as a clip and you will not want many links. As you can see in the picture, I use a long strand of chain at about two inches. Break the chain apart with wire cutters.
Use a jump ring to attach the feathers to the end of the chain. Place a jump ring on a snap clip and attach the chain to the same jump ring. Close the jump ring.
Now it is time to embellish your chain with a charm or two. Make sure your charm is not too big or heavy. You can even add beads to your chain if you like. Just add a jump ring and attach the jump ring to the links in the chain.
Create Well: This year, make something trendy for your teenagers (or yourself!)
Evans Photography - Helmar and May Arts
Wednesday, November 16, 2011
So, my dear husband took loads of pictures for me yesterday. I needed pictures for my first design team post for Helmar with May Arts ribbon. (A great excuse to wear my new Anthropologie sweater that I got for my birthday.) ;)
(top and sweater: Anthropologie; belt: The Gap;
necklace and headband by Jen Evans)
It's nice to know our old fence is good for something. ;)
These aren't the only wear-ables I have been creating lately. Soon I will be able to share with you some new necklaces that I have been working on for Helmar.
Besides this super cute sweater, I also got two more of my "favorite things" for my birthday last week. A super soft blanket and Cadbury's Crunchie candy bar! Now you know why I need to finish this post. ;)
Create Well: Give yourself a break. Snuggle under a warm blanket and just eat some chocolate.
Vintage Inspired Rosette Necklace and Headband
Monday, November 14, 2011
I am not sure if it is the weather, the Holiday Open House at Craft Warehouse I went to, or the box of Helmar goodies I got in the mail (or maybe it's all of the above) that has been keeping me creating all weekend long. Seriously, I can barely sleep with all the ideas in my head. I need to keep my inspirational journal by my bedside so that I can jot things down and get back to some much needed shut-eye.
Today I got my dear husband to take some pictures for the Helmar Design Team Blog. It is my first assignment for the team and I had a blast creating the necklace. I also created this headband as well. There is a new video on the post how to create the necklace. Check it out!
This weekend my sister, Mum, and I celebrated my birthday with coffee and a trip into some local shops. It really got me in the mood for the holidays. Although I am not quite ready to put my tree up, I am looking forward to planning for our new advent calendar. Do you have any unique and fun ideas to share?
Create Well: Prepare your homemade Christmas and holiday gifts early so you have time to share the month of December with your family and friends.
Today I got my dear husband to take some pictures for the Helmar Design Team Blog. It is my first assignment for the team and I had a blast creating the necklace. I also created this headband as well. There is a new video on the post how to create the necklace. Check it out!
This weekend my sister, Mum, and I celebrated my birthday with coffee and a trip into some local shops. It really got me in the mood for the holidays. Although I am not quite ready to put my tree up, I am looking forward to planning for our new advent calendar. Do you have any unique and fun ideas to share?
Create Well: Prepare your homemade Christmas and holiday gifts early so you have time to share the month of December with your family and friends.
Anthro-Inspired Necklace
Monday, October 24, 2011
Last year, at about this time, my husband gave me the sweetest birthday present. A gift card to my favorite store, Anthropologie. {What a sweetheart!} I got a beautiful necklace and later thought, "I wonder if I can make something like it?" My sister asked me to make one last year for a friend's birthday present. I sewed it with linen fabric and it was quite the chore! I was not excited to try it again until last week.
This time it was a no-sew project! It was much easier and I would be thrilled to make a few more. This is how I created it...
Supplies:
1 XL (or larger) t-shirt recycled or new
Helmar's 450 Quick Dry Adhesive
Tim Holtz' Sizzix Distressed Flower Diecut
wooden beads
thin yarn in the same color as t-shirt
sharp yarn needle
Cut the hem off the bottom of the t-shirt. Cut about two inches off the bottom of the t-shirt. Now you have a small strip. Pull on it so the edges curl. Begin in the middle of the strip. Tie a knot. Put a wooden bead in the fabric and squeeze Helmar's 450 Quick Dry on the bead and quickly fold over the fabric to cover the bead. Next, tie a knot pulling it close to the bead. Repeat the steps until you have the desired amount of beads. I used nine.
Use your die cut machine and cut out flowers from the rest of the t-shirt. Layer three flowers on top of each other and sew them with the yarn to the necklace. I layered mine above one side of the beads, but you could place yours where you like.
Tie it around your neck in a bow.
Create Well: Tried something once and it didn't go so well? Come at it again a different way and it may work!
Charmed, I'm Sure
Sunday, October 23, 2011How easy is this project?!
Use Stazon ink to stamp an image on white shrink film. The more detailed stamp you use the better. Then, punch with a large circle punch (it will shrink half it's size). Punch a hole at the top.
Put your circle in a container, I use a Rubbermaid dish washing bucket. Then use your heat embossing gun to heat the circle (keep the heat gun moving so it doesn't burn your project). It will shrink before your eyes. If it needs flattening, use a spatula before it cools. Add a jump ring and dog chain.
Create Well: It never hurt anyone to get a head start. ;)
Momenta - Wonder Necklace
Friday, July 16, 2010Supplies - Textured Cardstock (white, yellow, and striped): Momenta Pure: PA-1036; Punches: EK Success; Resin & Pendant: Magic Glos by Lisa Pavelka; Other: modge podge, vintage script, string of beads, necklace chain, jump rings, and spray paint
Art in miniature takes just as much time and effort for me as if I was doing a 12x12 page spread! Although this pendant is much smaller, it is easier to use and perfect for your 1" circle punch! {cutting and cts do not mix}
I purchased this pre-strung necklace, chain, the pendant, and I was ready to go!
I actually placed the pendant on the chain before filling it with resin. It was a lot easier to work with it that way.
Create Well: Purchase a pre-strung necklace and add to it to make a one-of-a-kind piece!
Momenta - Blush Flower Ring
Thursday, July 15, 2010Supplies - Polymer Clay: Sculpey Pink Pearl; Resin: Magic Glos by Lisa Pavelka; Rhinestones: Momenta Black and White ST- 3056; Adhesive: E-6000 & Super Glue; Other: Adjustable Ring Back (etsy.com), leaf cookie cutter, and UV 9 Volt Lamp
Scrapbooking rhinestones or gems are very universal! Try using them in the middle of a polymer clay flower for some bling on a ring or broach.
To make this one here are the instructions...
Roll out your polymer clay about ¼”. Also save a small piece to make a small ½” ball. Roll the ball and then flatten it to use it as your base.
Using a small leaf cookie cutter cut out about 12 leaves (I used my son’s flower cookie cutter but you can buy leaf shapes at your local craft store in the clay section). Take each leaf and place in your hand. You can use a clay tool for this or like me I just used my finger to push the clay out in my palm. Shape the leaf into a petal like shape and curl the ends a little. Push the end of the petal onto the base. Continue doing this step until you have layered the petals around the base.
Now you need to do the four small petals on the top. Cut two leaves from the rolled out clay. Cut them in half. Then press them in your palm and squeeze one end and pinch the end. Press it into the top of the flower. Do the same for the other three and cluster them together on the top of the flower.
Bake the flower on a non-stick craft sheet according to manufactures instructions. The flower will still be flexible when removed from the oven. Do not touch until it cools. When it cools then, it will harden.
Place the flower on a 3x5 card. Use the resin according to the manufactures instructions. Make sure you cover all areas of the flower. Place the card with the flower on it (makes an easy way to carry the flower) in the UV 9 Volt Lamp for 3-6 minutes.
Glue the rhinestones with E-6000 to the center of the flower hiding the seams. Use E-6000 and glue the flower to a ring base. Place a little bit of Super Glue around the edges of the ring base for extra strength. Let it dry overnight before wearing.
Create Well: Use your stash to add to other projects you are working on. It doesn't break the budget!
Bib Necklace
Friday, July 9, 2010I got this brilliant tutorial from the Craft Warehouse website. Haven't you always wanted to make one of these? It is way easier than it looks! I actually made this one in about an hour. It was a great Saturday project.
Have you ever had a {very} productive week artistically? I mean, a week where you just could not stop creating?
I have had one of those weeks. I am really starting to feel concerned. I have just finished my 16th project. I am {NOT} kidding. I am actually going to bed on time and getting way too much sleep. {Maybe that's it}...
Anyway... next time I lose my mojo, you can remind me of this time in my life. Where Jen went insane with creativity!
Create Often: Create until you drop. Literally.
Momenta - Pure Pendant & Ring
Wednesday, July 7, 2010
Pure Pendant, originally uploaded by createoften.
Supplies – Textured Cardstock: Momenta Pure PA-1036; Jewelry Blank: Amate Studios; Resin: Magic-Glos by Lisa Pavelka; Other: 9 Volt UV Lamp, modge podge, E-6000 Adhesive, & rhinestones
So this last weekend I finally got the 9 Volt UV Lamp I have been waiting patiently to go on sale. {sigh! so in love with it} You know the do-not-look-at-it-while-it-is-on kind of love. ;)
Supplies – Textured Cardstock: Momenta Pure PA-1036; Jewelry Blank: Amate Studios; Resin: Magic-Glos by Lisa Pavelka; Other: 9 Volt UV Lamp, modge podge, E-6000 Adhesive, & rhinestones
I used Momenta's Pure Textured Cardstock for the pattern inside the pendant and ring. I then filled it with resin. I love this look so much. It being my first try, I think it was a pretty easy project. I just need to learn how to get less air bubbles next time. ;)
Create Well: Don't be afraid to try a new technique or project. Maybe there is something you have wanted to learn but just afraid to give it a go! Go for it! You may find out you like it more than you imagined!
Guest Designer - Vicki Boutin
Tuesday, June 29, 2010
This week's guest designer is no stranger to the scrapbooking community. Vicki Boutin designs for 7 Gypsies, Sassafras, and Pink Paislee. She also works with Scrapbook Etc and Scrapbooks and Cards Today magazines. Her art captures the beauty of this craft and can be defined as elegance with added flair! Her pages just make my heart {soar}!
How would you describe your scrapbooking style? What makes your style your own?
I have an eclectic style and I enjoy exploring a lot of different mediums. Sometimes I create simple, linear projects and other times I like to add lots of layers to create artsy projects.
What inspires you to be creative?
I draw inspiration from many places such as ads, fashion, the internet and magazines. Certain colour combos drive me creatively, jewelry inspires me…the passion to create really does come from almost anything that captures my eye.
Who are your favorite scrapbook designers and why?
There are so many! I love Tim Holtz, Jennifer Mcguire, Elizabeth Kartchner, Jennifer Perks to name a few. I am missing so many! I love whimsical and technique based designs and these are a few people who embody that.
What are your favorite color combination to design with right now?
I love aqua, orange, red and brown. Really anything with aqua…that is my current favourite!
What is your creative process?
My motto is plan, sketch and execute. I like to sit down with my products, photos or a kit and look at how it all works together. Then I create sketches. Finally, I create or execute the project. I find joining into a project with a plan saves me a lot of time.
What is your story that you are trying to tell? How can this inspire others?
I believe that you have to have fun exploring the creative process. If it inspires you, give it a try. There really are no rules or critiques. If you think you made a mistake or didn’t do something “right” keep going! Some of the best art is created from Happy Accidents.
How can you inspire others to "create well"?
I guess my best advice is to find your creative “sweet spot” and go with it. If you like to make double page layouts…do it! If you enjoy stamping…do that! Just don’t put yourself in a “box” that prevents you from trying new things. I teach a number of workshops and find that many people will only take classes where the topic is something they are comfortable with. You don’t know if you will like something if you have never tried it. Get out of that box and explore it all!!! Like I said before…the most important thing is “Love what you are doing and have fun!”
You can follow Vicki's work, classes, and workshops at her blog. There you can also be inspired by her photography and scrap space.
Create Well: Find your creative “sweet spot” and go with it!
How would you describe your scrapbooking style? What makes your style your own?
I have an eclectic style and I enjoy exploring a lot of different mediums. Sometimes I create simple, linear projects and other times I like to add lots of layers to create artsy projects.
What inspires you to be creative?
I draw inspiration from many places such as ads, fashion, the internet and magazines. Certain colour combos drive me creatively, jewelry inspires me…the passion to create really does come from almost anything that captures my eye.
Who are your favorite scrapbook designers and why?
There are so many! I love Tim Holtz, Jennifer Mcguire, Elizabeth Kartchner, Jennifer Perks to name a few. I am missing so many! I love whimsical and technique based designs and these are a few people who embody that.
What are your favorite color combination to design with right now?
I love aqua, orange, red and brown. Really anything with aqua…that is my current favourite!
What is your creative process?
My motto is plan, sketch and execute. I like to sit down with my products, photos or a kit and look at how it all works together. Then I create sketches. Finally, I create or execute the project. I find joining into a project with a plan saves me a lot of time.
What is your story that you are trying to tell? How can this inspire others?
I believe that you have to have fun exploring the creative process. If it inspires you, give it a try. There really are no rules or critiques. If you think you made a mistake or didn’t do something “right” keep going! Some of the best art is created from Happy Accidents.
How can you inspire others to "create well"?
I guess my best advice is to find your creative “sweet spot” and go with it. If you like to make double page layouts…do it! If you enjoy stamping…do that! Just don’t put yourself in a “box” that prevents you from trying new things. I teach a number of workshops and find that many people will only take classes where the topic is something they are comfortable with. You don’t know if you will like something if you have never tried it. Get out of that box and explore it all!!! Like I said before…the most important thing is “Love what you are doing and have fun!”
You can follow Vicki's work, classes, and workshops at her blog. There you can also be inspired by her photography and scrap space.
Create Well: Find your creative “sweet spot” and go with it!
Subscribe to:
Posts (Atom)